
Upgrade to DREAMCen 6
Make sure no one is using the software or that they have open connections with the database
Verify that the user dream_user is the ‘owner’ of the database. If not, make it ‘owner’. STOP & DISABLE the scheduled task for backup and update for DREAMCen using dreamupdate (they can be reactivated at the end of the procedure) Use DREAMUPDATE version 6 ! . download and install the latest version of this utility.
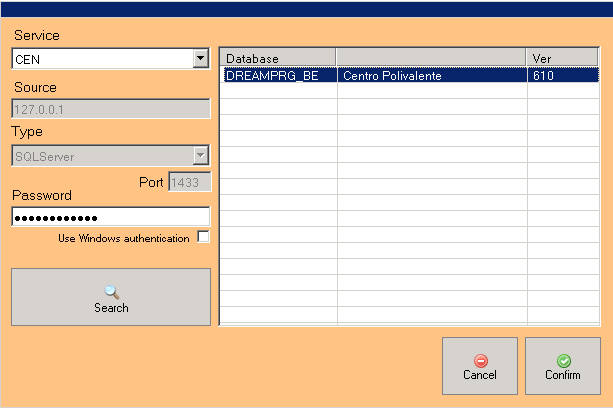
- Select the Migration TAB and click on the “Search” button to search for the right database to migrate.
 A window will appear where you can search for the database
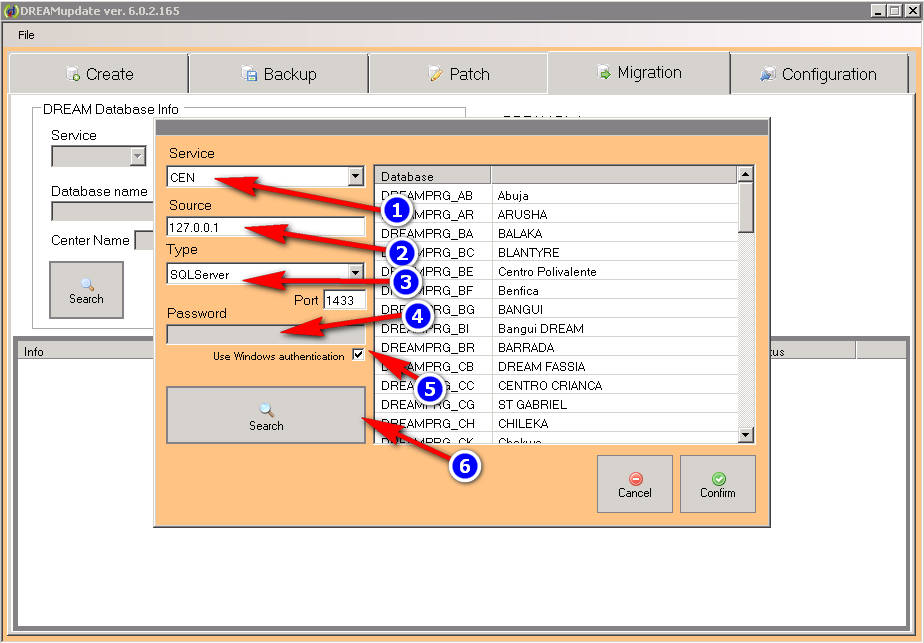
- Select the “CEN” service
- Write the ip address of the server when the database is installed. If is the same server where the dreamupdate utility is running you can write 127.0.0.1 (localhost). BUT please first check which address is used in the configuration section. If 127.0.0.1 is used you must use this address. If another address is used instead you must use the address specified in configuration.
- Select the database engine you are using. (normally, in DREAM centers it is SQLServer)
- Write the sa sql server password or , if you are on the same server where the dreamupdate utility is runnig and you are a superuser, check the “Use Windows authentication“
- Click on the “Search” button.
 The database will appear (in almost all centers only one will appear. Only in some cases there may be more databases to update. In this case the procedure will be repeated). Click on “Confirm” to confirm your choice.
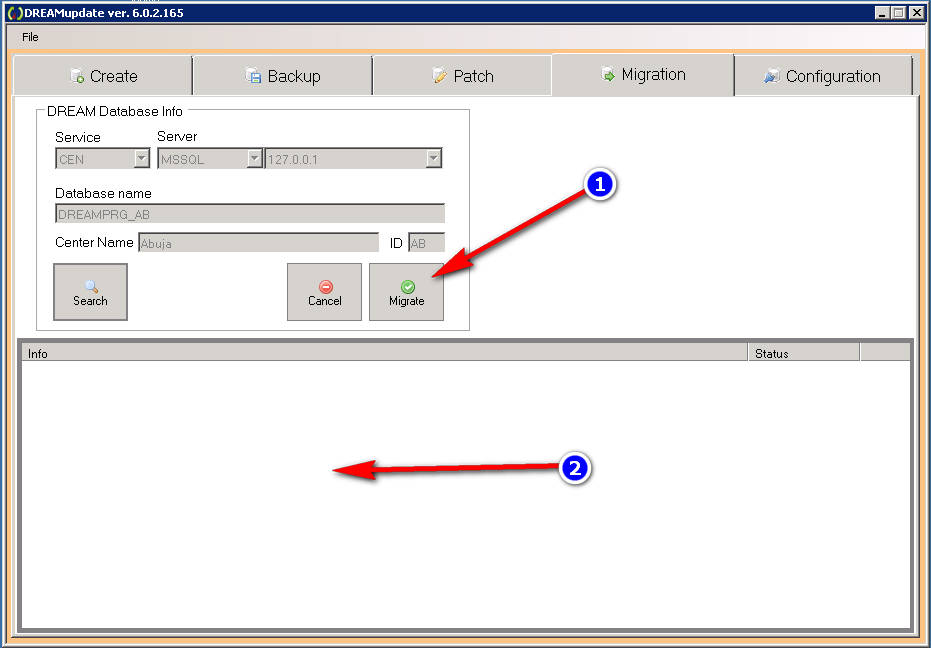 Finally click on “Migrate” to start the migration and wait for the procedure to finish. It can take a few minutes for small databases or even an hour for the largest database.
Check the information window for errors.
After migration, check that there have been no errors. Then proceed to try version 6 client software.
You can delete all the files you have in the c:\dream_srv\setup\dreamcen\ folder .
Then run latest DREAMCen6.XXX_UpdateServerSetup.exe file to prepare the new setup.
Finally start dreamcen on the client pc and they will autoupdate. If not please check the dreamupdate path if is well configured.
If everything works completely, you can proceed to delete the old tables of version 5 using the appropriate button .
After migration is complete and old tables have been deleted it is advisable to shrink the database (from Sql Server Management Studio).
Dream 6 is ready to use but you will need to use DREAMCen6.XXX_UpdateServerSetup.exe to install version 6 of the client DREAMCen. After doing this, it is necessary to check that all client PCs update themselves to version 6. If this does not happen, check if the dreamupdate path is correctly set in the client and if this network path is accessible by clients with the users currently used by the operators.
Finally, you need to report the successful migration to the help desk staff and try sending a full backup.
Finally click on “Migrate” to start the migration and wait for the procedure to finish. It can take a few minutes for small databases or even an hour for the largest database.
Check the information window for errors.
After migration, check that there have been no errors. Then proceed to try version 6 client software.
You can delete all the files you have in the c:\dream_srv\setup\dreamcen\ folder .
Then run latest DREAMCen6.XXX_UpdateServerSetup.exe file to prepare the new setup.
Finally start dreamcen on the client pc and they will autoupdate. If not please check the dreamupdate path if is well configured.
If everything works completely, you can proceed to delete the old tables of version 5 using the appropriate button .
After migration is complete and old tables have been deleted it is advisable to shrink the database (from Sql Server Management Studio).
Dream 6 is ready to use but you will need to use DREAMCen6.XXX_UpdateServerSetup.exe to install version 6 of the client DREAMCen. After doing this, it is necessary to check that all client PCs update themselves to version 6. If this does not happen, check if the dreamupdate path is correctly set in the client and if this network path is accessible by clients with the users currently used by the operators.
Finally, you need to report the successful migration to the help desk staff and try sending a full backup.
 Click on “Full” and then, when the process is completed, click on “Send”.
NOTE for date format on the client: We recommend using dd/mm/yyyy date format on all the clients. Choose ENGLISH/UnitedKingdom and not other date format like the date format used in USA or other like 01 – Jan – 2021 or 2021-01-11 or other date format. Notice: each login name has its own date format, so you need to verify that all the users using the software have the correct date format. After changing the local date format, you need to log in and then log in again. DREAMCen version 6.1 accept any date format, but if the program reports errors please use the recommended date format
Missed appointments utility. It is necessary to use the new utility by replacing the files with those contained in MissedApps_6.zip
Upgrade to DREAMCen 6.1
Version 6.1 introduces some fixes to the 6.1 database model to allow better management of incremental backups and export and import of medical records.
To upgrade to version 6.1 it is necessary to start from version 6.0. It is clearly possible to go from version 5 to 6.1, but always through the intermediate step of version 6.0.
Before launching the upgrade command to version 6.1 it is important to make a SQL Server backup to be able, in case of migration failure, to go back and then be able to repeat the operation if necessary. Check that there is enough disk space. The available space must be at least 4 times the size of the database.
Make sure no one is using the software or that they have open connections with the database
To perform the migration you need to use dreamcen version 6.1.2.221 or higher.
These are the steps to carry out the migration to 6.1:
- Configure the dreamupdate utility, if it has not already been done.
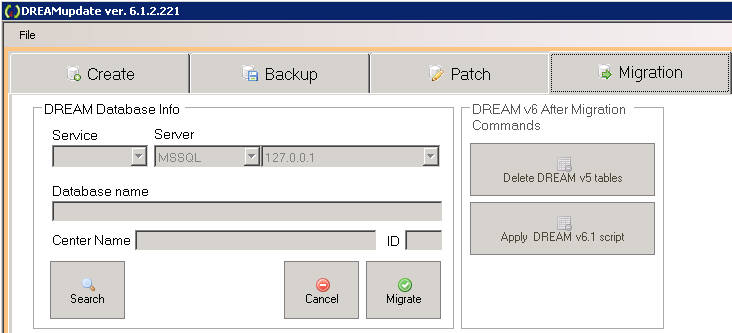
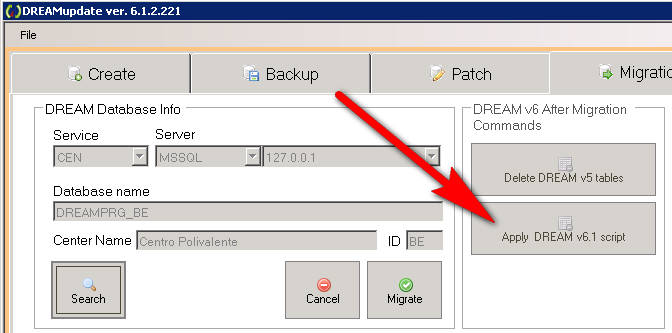
- Select “Migration” tab.
- Click on “Search” button to search for and select the correct database.
- Click on the “Confirm” button.
The button “Apply DREAM v6.1 script” will be enabled with which we can start the migration process.
The process can take several minutes depending on the size of the database. At the end check that there are no errors. If errors occur it is necessary to restore the database using the SQL Server Restore function, notify technical support and decide what to do with them.
NOTE: After upgrade to DREAMCen 6.1 YOU MUST Upgrade DREAMLab to version 5.822 or greater
If you have disabled the scheduled tasks for update and backup you can re-enable them now
Dream 6.1 is ready to use but you will need to use DREAMCen6.1XXX_UpdateServerSetup.exe to install version 6.1 of the client DREAMCen. After doing this, it is necessary to check that all client PCs update themselves to version 6.1. If this does not happen, check if the dreamupdate path is correctly set in the client and if this network path is accessible by clients with the users currently used by the operators. (it will auto-update if clients are 5 or 6.632)
Finally, you need to report the successful migration to the help desk staff and try sending a full backup.
Click on “Full” and then, when the process is completed, click on “Send”.
Upgrade from DREAMCen 5 to 6.1
To upgrade to version 6.1 from version 5 of DREAMCen it is necessary to agree with the help desk team. Notify staff when you are about to start the migration.
Make a SQL Server Full backup of the database to be able to go back in case something goes wrong.
Check that there is enough disk space. The available space must be at least 4 times the size of the database
Verify that the user dream_user is the ‘owner’ of the database. If not, make it ‘owner’.
Make sure no one is using the software or that they have open connections with the database
STOP & DISABLE the scheduled task for backup and update for DREAMCen using dreamupdate (they can be reactivated at the end of the procedure)
Use DREAMUPDATE version 6.1 . download and install the latest version of this utility. (DREAMUpdate6.12228_Setup.exe or higher)
BEFORE install DREAMUpdate6.12228_Setup.exe or higher please check the name of the existing folder : if is different from c:\dream_srv\dreamupdate please rename in (or move to) c:\dream_srv\dreamupdate. After you can run the setup installing in this folder. In this way you will preserve the configuration.
- Select the Migration TAB and click on the “Search” button to search for the right database to migrate.
A window will appear where you can search for the database
- Select the “CEN” service
- Write the ip address of the server when the database is installed. If is the same server where the dreamupdate utility is running you can write 127.0.0.1 (localhost). BUT please first check which address is used in the configuration section. If 127.0.0.1 is used you must use this address.
If another address is used instead you must use the address specified in configuration. - Select the database engine you are using. (normally, in DREAM centers it is SQLServer)
- Write the sa sql server password or , if you are on the same server where the dreamupdate utility is runnig and you are a superuser, check the “Use Windows authentication“
- Click on the “Search” button.
The database will appear (in almost all centers only one will appear. Only in some cases there may be more databases to update. In this case the procedure will be repeated). Click on “Confirm” to confirm your choice.
Finally click on “Migrate” to start the migration and wait for the procedure to finish. It can take a few minutes for small databases or even an hour for the largest database.
Check the information window for errors.
After migration, check that there have been no errors.
IF THERE ARE ERRORS, PLEASE RESTORE version 5 database with SQL Server restore utility and contact the helpdesk staff
If no errors we can apply the DREM v6.1 script update
Version 6.1 introduces some fixes to the 6.1 database model to allow better management of incremental backups and export and import of medical records.
To upgrade to version 6.1 it is necessary to start from version 6.0. It is clearly possible to go from version 5 to 6.1, but always through the intermediate step of version 6.0.
Before launching the upgrade command to version 6.1 it is important to make a SQL Server backup to be able, in case of migration failure, to go back and then be able to repeat the operation if necessary. Check that there is enough disk space. The available space must be at least 4 times the size of the database.
After the SQL Backup is complete you can proceed.
To perform the migration you need to use dreamcen version 6.1.2.221 or higher.
These are the steps to carry out the migration to 6.1:
- Configure the dreamupdate utility, if it has not already been done.
- Select “Migration” tab.
- Click on “Search” button to search for and select the correct database.
- Click on the “Confirm” button.
The button “Apply DREAM v6.1 script” will be enabled with which we can start the migration process.
The process can take several minutes depending on the size of the database. At the end check that there are no errors. If errors occur it is necessary to restore the database using the SQL Server Restore function, notify technical support and decide what to do with them.
NOTE: After upgrade to DREAMCen 6.1 YOU MUST Upgrade DREAMLab to version 5.822 or greater
If you have disabled the scheduled tasks for update and backup you can re-enable them now
If everything works completely, you can proceed to delete the old tables of version 5 using the appropriate button .
After migration is complete and old tables have been deleted it is advisable to shrink the database (from Sql Server Management Studio).
Dream 6.1 is ready to use but you will need to use DREAMCen6.1XXX_UpdateServerSetup.exe to install version 6.1 of the client DREAMCen. After doing this, it is necessary to check that all client PCs update themselves to version 6.1. If this does not happen, check if the dreamupdate path is correctly set in the client and if this network path is accessible by clients with the users currently used by the operators.
Finally, you need to report the successful migration to the help desk staff and try sending a full backup.
Click on “Full” and then, when the process is completed, click on “Send”.
Missed appointments utility.
It is necessary to use the new utility by replacing the files with those contained in MissedApps_6.zip
Q & A
Q: If there are errors in the migration from 5 to 6, can I repeat the procedure?
A: No. Please notify the support team and allow them to log in and check what happened. If this cannot be done in time, you can still continue to use version 5 of the software. There is no need to do a database restore.
Q: If there are errors in the migration from 6 to 6.1, can I repeat the procedure?
A: No. Please notify the support team and allow them to log in and check what happened. If this cannot be done in time, you MUST restore the database version 6 from SQL Backup and then continue to use version 6 of the software.
Q: If I have deleted the old version 5 tables, can I continue to use the version 5 software if I need to revert to version 5 ?
A: No. In this case the only way to use version 5 is to restore a backup of version 5. But If you have added data with version 6, you will lost all the new records added
Q: I entered data in version 6. Can I go back to version 5 ?
A: No. You would lose any new data you entered with version 6.
Q: I successfully migrated to version 6. Can the client software version 5 work?
A: No. All client software must be version 6