1.Reception
Reception
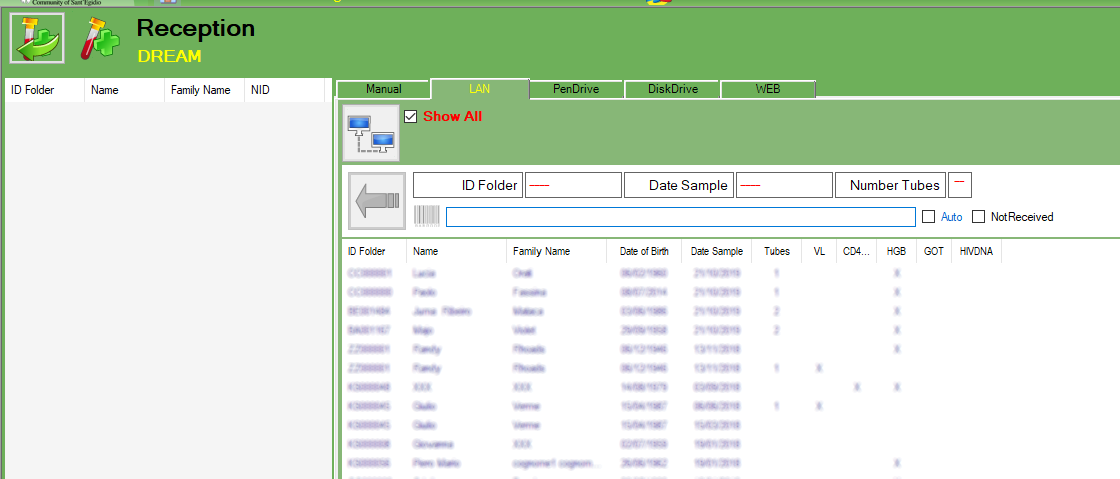
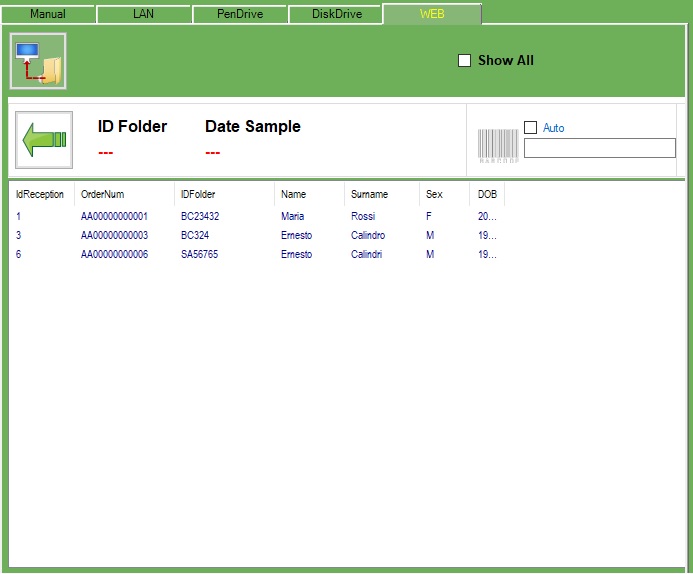
There are many ways the exams can be received:
-Manual
-LAN
-PenDrive
-DiskDrive
-WEB
The “Not received” means that the test is not received, the exam will be automatically closed with the option “not received” and ready to go back to the center.
RECEPTION FROM BARCODE
HOW TO USE
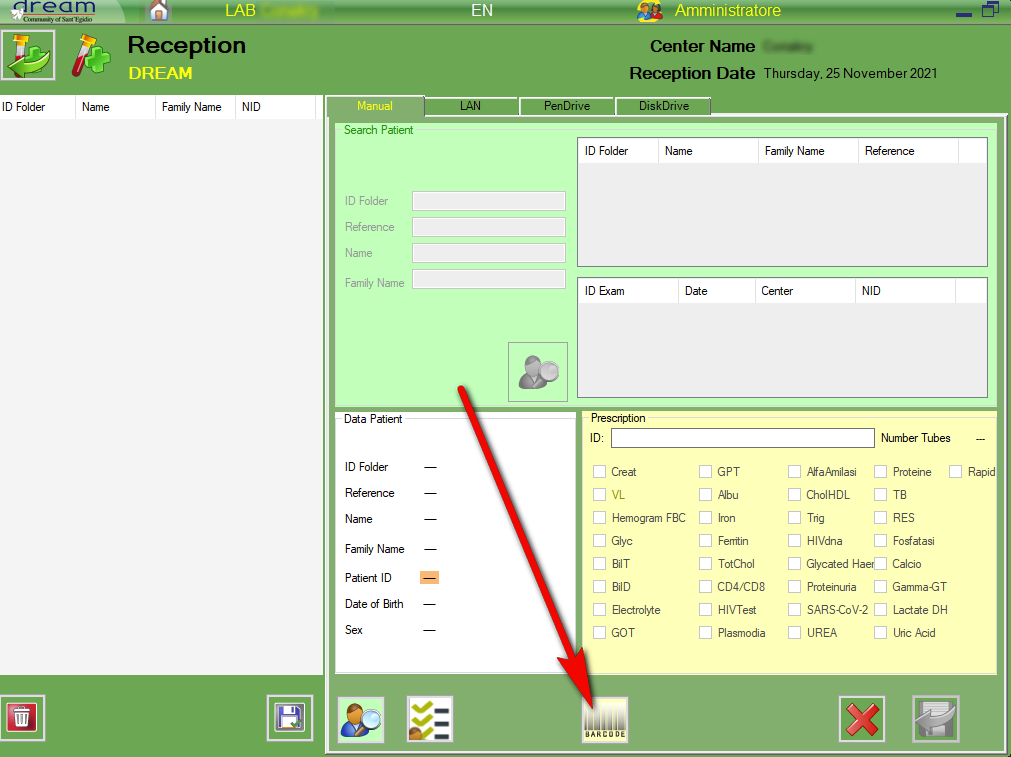
In laboratories where dysalab is used to make the viral load:
after accepted the sample with dysa, the label with the dysalab identification code must be printed and attached to the prescription sheet printed by dreamcen.
At this point, the acceptance must be done with dreamlab using the barcode function
It is first necessary to scan the dysalab barcode and then the 3 barcodes that are printed by dreamcen in the prescription form.
In this way the dysalab identification code will also be acquired by dreamlab and can later be used to automatically import the results.
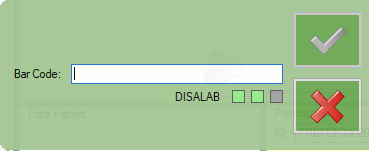
Select “Barcode”
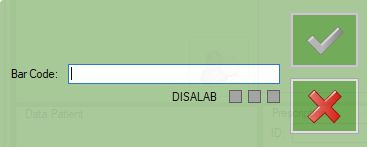
Scan on the dysalab barcode you have on the dreamcen prescription sheet (it start with PDM…)
DISALAB label will be showed to signaling that the dysalab code was recognized
You can continue to scan the other barcodes

until the sample is accepted
1.1.Formulary
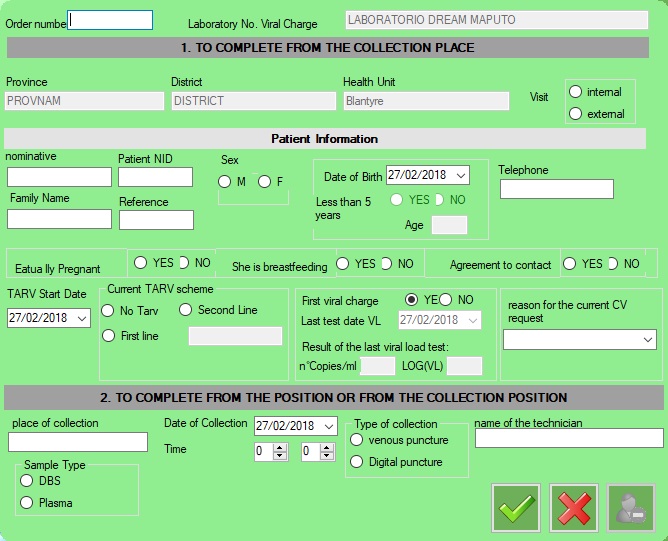 Formulary
–Patient NID: If not selected a Dream center it will be disabled and filled with a NID calculated.
–less Than 5 years: not editable field
–Age: not editable
In the tab_pazienti table, will be updated only:
-Nominative, Family Name, reference, Date of Birth, telephone, Actually pregnant, beastfeeding, agreemntcontract
The formulary is available in:
-Management Viral Load
-reception
2.Work memo
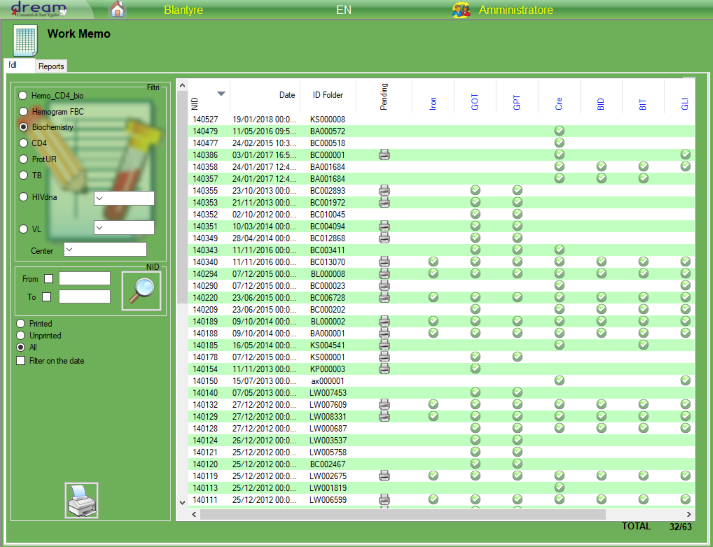
| Filter | has subfilter | show calendar | use calendar date | Check Today |
|---|---|---|---|---|
| Hemo_CD4_Bio | X | X | ||
| Hemogram FBC | X | X | ||
| Biochemistry | X | only when use subfilter | ||
| CD4 | X | X | ||
| ProtUR | X | X | ||
| TB | X | X | ||
| HIVdna | X | Today | X | |
| CV | X | Today | X |
3.Exams
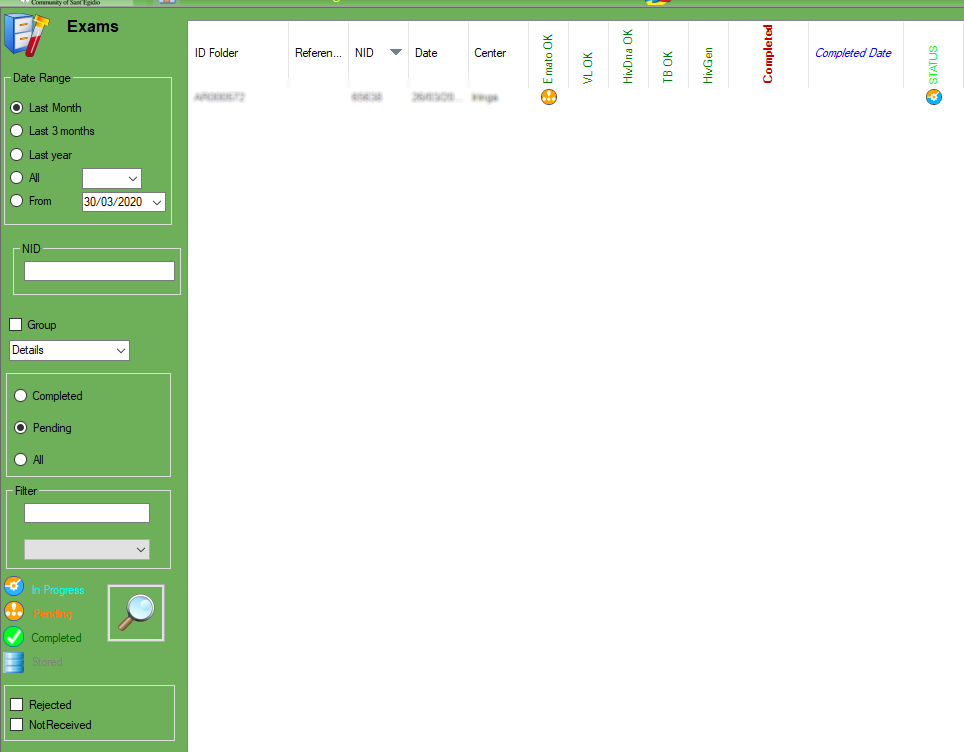
Exams
In Exams section is possible to filter the exams based on date range, and see the details.
The options “rejected” defines the rejection function from machine and the “not received” defines the exam as not received .
The selected exam will be automatically closed with the selected option option and ready to go back to the center, you need to select the exam and select the proper option to change the status.
4.Exam
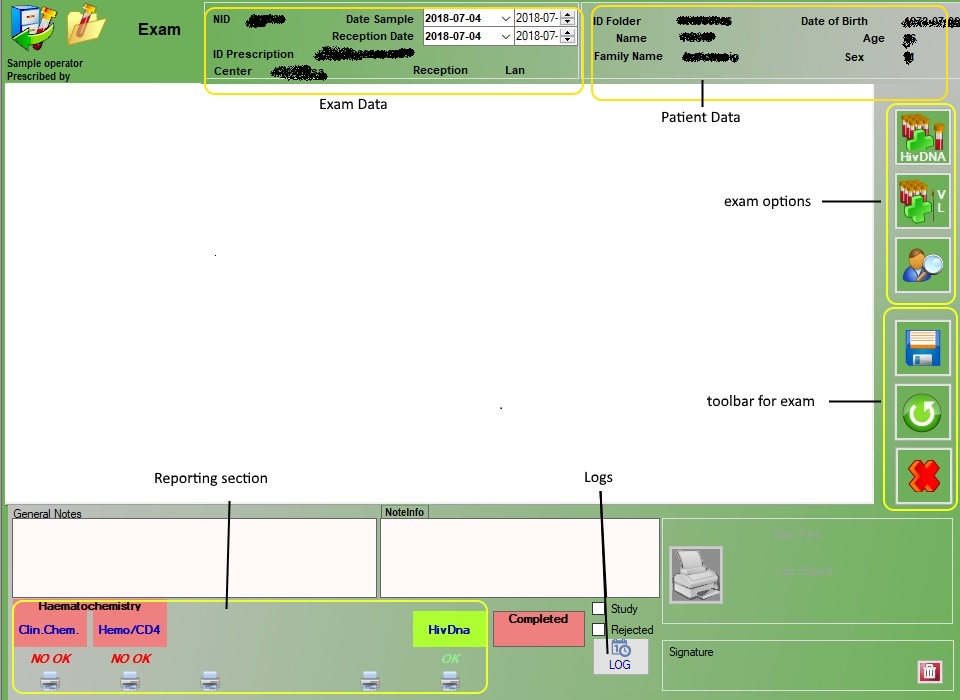
 |
Enter values HIVDNA store |
 |
Enter vlues VL store |
 |
Go to patient’s detail |
 |
Save |
 |
Cancel / Reload values |
 |
Delete prescription |
The option “rejected” defines the rejection function from machine, the exam will be automatically closed with the option “rejected” and ready to go back to the center.
LOG
In the LOG button, it’s possible to see the list of operations involved in the exam
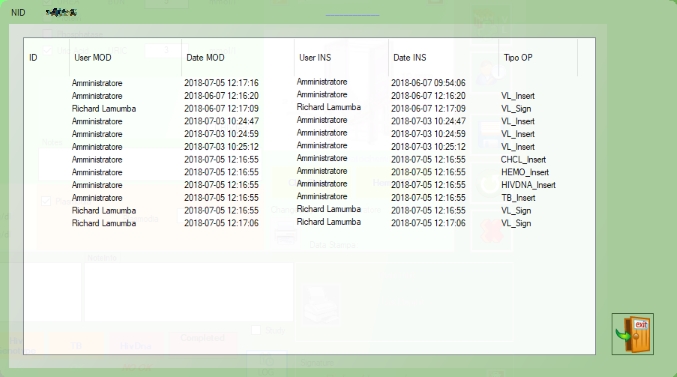
Legend:
| Command | Description |
| CHCL_insert | CHCL inserted |
| HEMO_Insert | HEMO inserted |
| TB_Insert | TB inserted |
| VL_Insert | VL inserted |
| VL_Sign | VL signed |
| VL_UnSign | VL Unsigned |
| CD4_Insert | CD4 inserted |
| HIVDNA_Insert | HIVDNA inserted |
| HIVDNA_Sign | HIVDNA signed |
| HIVDNA_UnSign | HIVDNA Unsigned |
| CHCL_Insert_MC | insert from machine BioSpinLab |
| HEMO_Insert_MC | insert from machine HemoBeckman |
| CD4_Insert_MC | insert from machine CD4CD8 |
| VL_Insert_MC | insert from machine ViraLoad |
| HIVDNA_Insert_MC | insert from machine Hivdna |
4.1.Chemistry

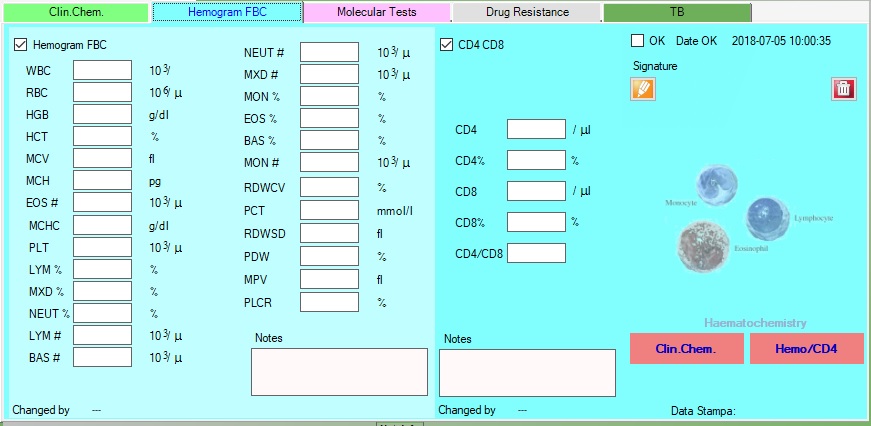
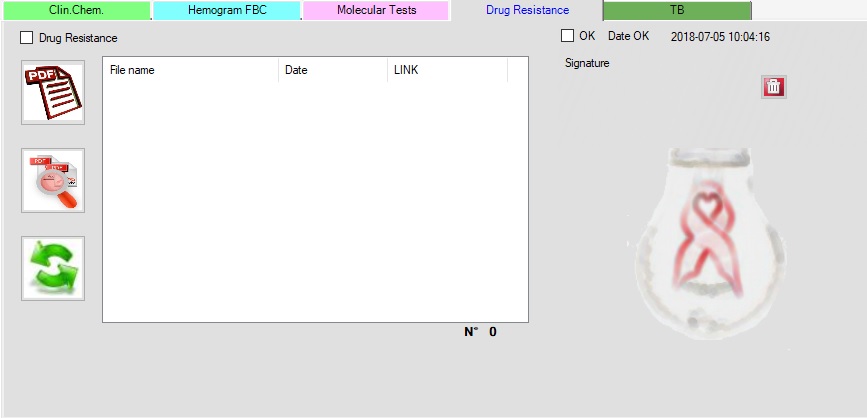
It’s possible to assign for every exam a value by checking the label
the OK checkbox is enable only when one of the exams will be checked, then it will be possible to sign it, unchecking the OK automatically delete the signature
4.2.Hemogram
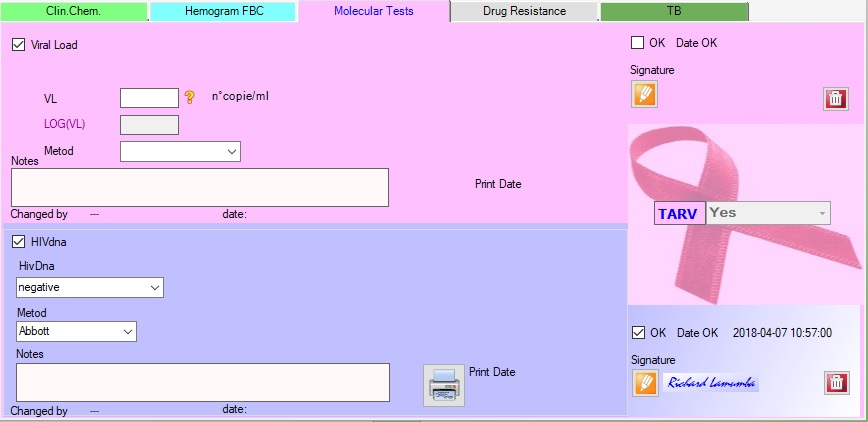
4.3.Molecular test
4.4.Drug resistance
4.5.TB

4.6.SARS-CoV-2
Operating procedure for SARS-CoV-2 Dream Lab section
RECEPTION:
To proceed with the insertion of the SARS-CoV-2 samples into the Dream Lab, you must access the “Reception” section.
In the left column you must select the center of origin of the samples.
At this point click on “New Reception”.
Manual acceptance is required.
First, it is necessary to check ![]() whether the patient is already present in the Dream Lab database.
whether the patient is already present in the Dream Lab database.
To do so, click on the “Search” button to activate the “Search Patient”![]() search field. Here you can use 4 search fields,
search field. Here you can use 4 search fields,
then clicking the “Search” button below the search fields. If the patient is found, it is necessary to verify that the data correspond to that of the SARS-CoV-2 sample before proceeding, in order to avoid patient exchange errors.
If the patient is not present in the database, click on the button ![]() and fill in the necessary fields.
and fill in the necessary fields.
Once the patient has been identified or created, check the SARS-CoV-2 box in the “Prescription” field below.
At this point you need to save the prescription with the “Save” button . ![]()
In this way the prescription will appear in the left column and a NID is assigned to the sample.
Once acceptance of all SARS-CoV-2 samples has been completed, the list must be saved with the “Save” button .![]()
At this point, reception has ended.
You can find all the accepted samples in the SARS-CoV-2 section of the “Home”, waiting for a result.
INSERTING RESULTS:
To insert the results, you must go to the SARS-CoV-2 section of the “Home” and search through the NID for the sample whose result you want to insert.
In the result dropdown you can choose between POSITIVE, NEGATIVE, INDETERMINATE, NOT PROCESSABLE, <LDL,> HDL.
Furthermore, if you select POSITIVE, the possibility of entering a numerical value will be activated (if a test is quantitative).
In the case of a quantitative test with a numerical value, it is also necessary to select the method you used.
Once the result has been entered, click OK, sign, save and print the exam.
FINDING THE STATISTICS:
There is a dedicated section for SARS-CoV-2 in the EVIDENCE section, where you can find information on the tests performed and pending.
5.Configuration
5.1.Data
The Data section is divided in several sub sections:+
-Centers
-Responsables
-DbInfo
Centers
| IDcenter | |
| Name | Center’s name |
| Center code | |
| Min_code | ministerial code |
| Province | |
| District | |
| Telephone | |
| Dream | is a DREAM center |
| Manual | |
| LAN | the center is allowed to manage operations by LAN |
| Disk | |
| WEB | the center is allowed to manage operation by web service |
| EnableID | |
| Printer | is allowed to print on the printer |
| PrintPDF | is allowed to print on PDF (the pdf directory is set on dbInfo at ReportPath parameter) |
| Fax |
DbInfo
| BioSpinlab | |
| CD4CD8 | |
| CENTER_ PiePag | |
| CENTER_ PiePag1 | |
| CENTER_BC_DB_Name | |
| CENTER_BC_DB_Source | |
| CENTER_DBPath | |
| CENTER_Intesta0 | |
| CENTER_Intesta1 | |
| CENTER_Intesta2 | |
| CENTER_Intesta3 | |
| CENTER_KS_DB_Name | |
| CENTER_KS_DB_Source | |
| DB_box | mdb file path |
| DB_IDENTITY | |
| DB_NAME | |
| DB_SA_PASSWORD | |
| DB_VERSION | |
| DIR_Allegati | path to save attachements |
| DREAMBKP_FORCETOTAL | |
| DREAMBKP_RANGE | |
| DREAMBKP_TOTESTRAZIONI | |
| HemoBeckman | |
| HemoSysmex | |
| LAB_ADMIN_PASSWORD | |
| LAB_CONF_PASSWORD | |
| LabMinCode | |
| MotiviPrescrizione | |
| PathCD4CD8 | |
| PathDoc | |
| ReportPath | path to save PDF file |
| ReportPathPNid | the PDF file is saved without the folder named as the patient’s NID |
| SERVICE_TYPE | (‘LAB’,’CEN’) defines the service type |
| Sysmex1000 | |
| TB_Name | |
| TestHIV1_Name | |
| TestHIV2_Name | |
| TestHIV3_Name | |
| TestHIV4_Metod | |
| TestHIV4_Name | |
| ViralLoad_Metod | |
| ViralLoad_MetodXX | |
| ViralLoadType | |
| WEBaccIP | web service IP ( must end with ‘/’) |
| WEBaccPage | page that contains web service |
| WEBaccPass | password to use web service |
| WEBaccUser | username to use web service |
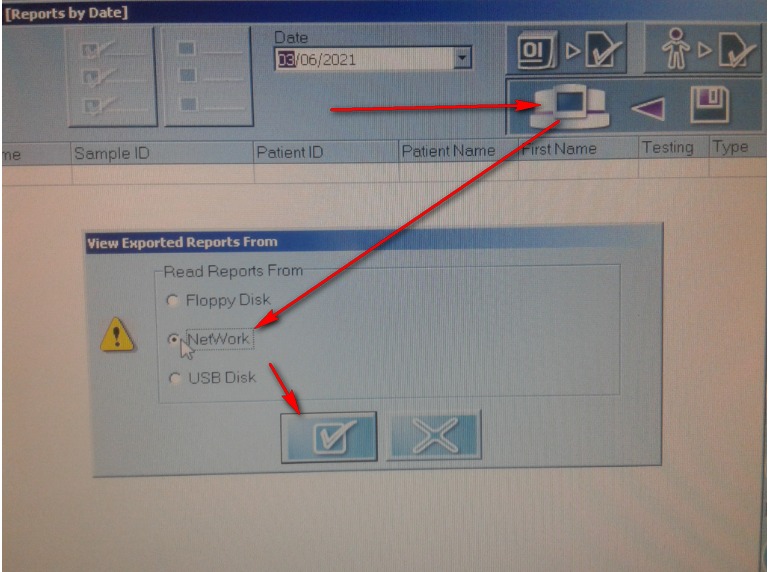
5.2.Export
La procedura di export di divide in 2 sezioni:
1) Per cartella, selezionando la directory o disco remoto
2) Per penna USB, dove il programma individua la prima chiavetta e gestisce l’export
Entrambe le procedure successivamente eseguono queste operazioni:
1)verifica file .ini esistente
nella directory selezionata deve trovarsi il file con estensione .ini contenente le richieste da esportare
il nome del file deve avere il nome nel formato: “DREAM_TRS_” codiceCentro “.ini”, dove codiceCentro è l’ultima parte nella casella a discesa che distingue il codice del centro selezionato.
2)Copia locale
viene letto il file XML dalla cartella, il nome è scritto nel file .INI, il file viene gestito inizialmente in locale tramite il file tmp.xml decriptandolo,
3)Filtro XML
viene letto il file filtrando per DataInvioLab che sia vuoto o NULL
4)aggiornamento file XML del centro
per ogni IDPrescrizione del file XML viene impostata la dataInvioLab alla data odierna in modo da non ripetere le operazioni una seconda volta.
5)creazione XML
creazione file XML temporaneo EXTMP.xml dove vengono salvate le tabelle TrsParam e TrsPrelievi, in cui viene esportata la tabella Edesami ed EsamiEx e riempiti in base alla IdPrescrizione del file Originale, e poi salvato nella directory in modo criptato
I riferimento al nuovo file xml sono nel nuovo file .INI
I record dei prelievi vengono valorizzati in base ad una query su Esami, vengono filtrati in base ad: (laboratorio 3247)
idPrescrizione , DataGeneralpR deve avere un valore, BoolCompletato valorizzato, e ListaDef esame comprende uno di: (12,13,20)
nel caso viene trovato un record, viene impostato boolRichiesto a True nel DB laboratorio
5.3.DreamLink
If enabled to communicate with web service, it appears a new tab with the patient inserted online
To make sure to download all new patients, check those parameters on configuration panel (db_info table in DREAMLab):
| WEBaccIP | web service’s full address http://… |
| WEBaccPage | testGet.php |
| WEBaccPass | password |
| WEBaccUser | username |
| LabMinCode | The same code configured in DREAMLink |
| WEBDaysSend | the days from today to send on the web |
The system will download only the new patients of the same center and with NID null
once downloaded it will be possible to update all informations using the formulary.
At the end of the procedure an hidden task will send all information to the web service included the NID.
5.4.MaxMin values
MaxMin Values
This form shows the range values for each exam
AgeMin and AgeMax are based on days and represent the age range, 7000 is general for adult , the operator can add on more row with a new range
Sex can have: U for unisex if the range does not have any difference for sex range then M male F female
CategoryAB is a definition for the age, a=adult b=children
IdValuesNormal is a internal ID reference, not mandatory
IDesame The exam name
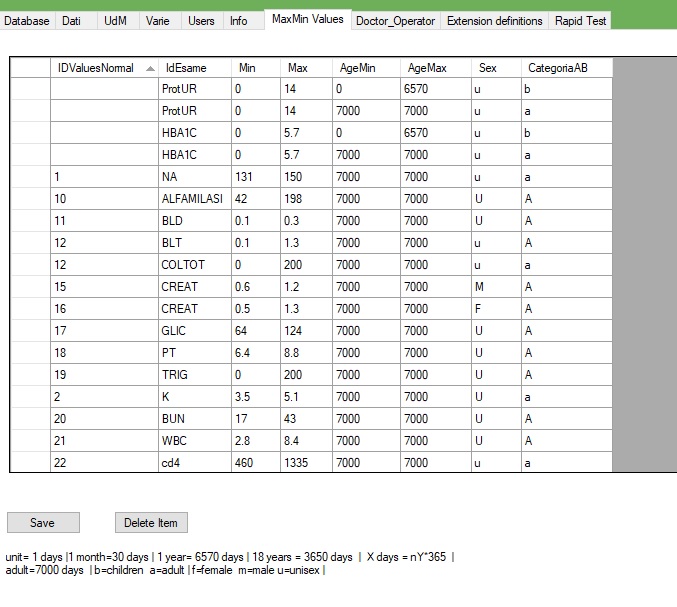
To add a new row you just need to write down the last rown on the grid
To edit tap double click on the value to change
6.Database
tabelle di trascrizione
| Table Esami | use |
| BoolEsame1 | if is a study |
| BoolEsame2 | PCR# |
| BoolEsame3 | not used |
| BoolEsame4 | FdLStampato |
| Esame42 | StatoTARV |
| Esame4 | Tipo di raccolta (venosa, digitale) [TIPOprelievo] |
| F_TipoCampione | Tipo di campione (PLASMA,DBS), come per Dat_dbs |
| IDPaziente | |
| IDPrescrizione | |
| IDFirma | |
| IDCentro | |
| NID | |
| Data | |
| DataGeneralPR | |
| DataCViralPR | |
| DataGeneralEmail | |
| BoolCViralPR | |
| BoolHemogramma | |
| Leuco | |
| Eritro | |
| Hemo | |
| Hema | |
| VGM | |
| HGM | |
| CHGM | |
| Plaq | |
| LYM | |
| MXD | |
| NEUT | |
| LYM2 | |
| MXD2 | |
| NEUT2 | |
| MON | |
| MON2 | |
| EOS | |
| EOS2 | |
| BAS | |
| BAS2 | |
| BoolCreat | |
| Creat | |
| BoolGlic | |
| Glic | |
| BoolBlTot | |
| BlTot | |
| BoolBlDir | |
| BlDir | |
| BoolGOT | |
| GOT | |
| BoolGPT | |
| GPT | |
| BoolAlbu | |
| Albu | |
| BoolFerro | |
| Ferro | |
| BoolFerritina | |
| Ferritina | |
| BoolElettroliti | |
| Na | |
| K | |
| Cl | |
| BoolHIV | |
| HIV | |
| TestHIV1 | |
| TestHIV2 | |
| TestHIV3 | |
| BoolCD4_CD8 | |
| CD4 | |
| CD4proc | |
| CD8 | |
| CD8proc | |
| CD4_CD8 | |
| BoolCViral | |
| CViral | |
| BoolOKCviral | |
| BoolPlasmodium | |
| Plasmodium | |
| BoolAlfaAmilasi | |
| AlfaAmilasi | |
| BoolColTot | |
| ColTot | |
| BoolColHDL | |
| ColHDL | |
| BoolTrig | |
| Trig | |
| BoolEsame1 | |
| Esame1 | |
| BoolEsame2 | |
| Esame2 | |
| BoolEsame3 | |
| Esame3 | |
| BoolEsame4 | |
| Esame4 | |
| Note | |
| BoolInviato | |
| BoolCompletato | |
| BoolRichiesto | |
| BoolDaRipetere | |
| DataCompletato | |
| DataInviato | |
| ProtocolloCD4 | |
| GateA | |
| GateB | |
| GateC | |
| GateI | |
| Time_Stamp | |
| ReceptionType | |
| BoolBK | |
| BK | |
| BoolEsame11 | |
| Esame11 | |
| BoolEsame21 | |
| Esame21 | |
| BoolEsame31 | |
| Esame31 | |
| BoolEsame41 | |
| Esame41 | |
| BoolEsame12 | |
| Esame12 | |
| BoolEsame22 | |
| Esame22 | |
| BoolEsame32 | |
| Esame32 | |
| BoolEsame42 | |
| Esame42 | |
| BoolHIVDNA | |
| HivDnaMetodo | Metodo per HIVDNA |
| HivDnaMetodo2 | metodo per CV |
| BoolAllegatiResistenze | |
| Resistenza | |
| BoolTubercolosi | |
| ChCLDataOK | |
| ChCLDatastampa | |
| HemoCd4DataOK | |
| HemoCd4Datastampa | |
| TestMolecolariDataOK | |
| TestMolecolariDatastampa | |
| HivGenotipoDataOK | |
| HivGenotipoDatastampa | |
| TBCDataOK | |
| TBCDatastampa | |
| HIVDNADataStampa | |
| HIVDNADataOK | |
| IdFirmaVL | |
| IdFirmaEmatochimica | |
| IdFirmaHivDna | |
| IdFirmaHIVGenotipo | |
| IdFirmaTBC | |
| FlagRicevutaConsegnato |
7.Report
7.1.Report evidence
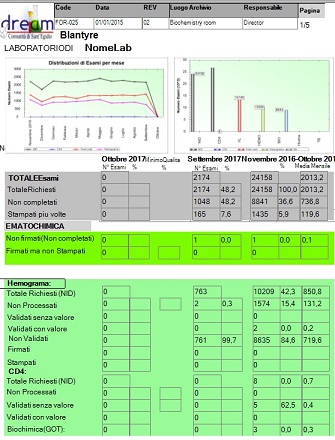
Evidence Report
The report shows the total NIDs based on the requested period.
There are 3 main column details:
Month: Shows the total based in the previous month
Previous month: Shows the total based in the previous month of the column “Month”
Selected Period: Shows the total based in the selected period before to lunch the report (1 month, 6 months , 1 year)
Every column has his own percentage based on the total, and the average for the last period column.
The report shows the NIDs based on the value of the following exams:
Hemogramma, CD4, GOT, GPT, Clicemia, AlfaAmilasi , Creatina, Ferro, BilDir, BilTot, Proteinuria, Albumina, Col Tot, Col HDL, Trigliceridi, Plasmodium, Ferritina, Elettroliti, Viral Load, Tubercolosis.
For every exams are showed the followng data:
Total requested (NID), not processed, validated without valiue, validated with value, not validated, signed, printed.
Statistics

this section shows the statistics about:
-time spent exam GR exams in the month
-exams printed in the month and requested in the same month
-exams printed in the month and requested in the same month
-examinations printed in the period (total printed only but not necessarily required in the same month)
-CVs printed in the period and requested in the same month (partial)
7.2.Schema filter
Schema filters
| Descrizione | BoolRichiesta | Valore | OK(Validati) | Firma | Stampa |
| Requested | Look down | ||||
| Not processed | Look down | NULL | NULL | ||
| Not validati | Look down | has Value | NULL | ||
| Validated no value | Look down | Null | Has Value | ||
| Validated with value | Look down | Has value | has Value | ||
| Signed | Look down | Has value | Has value | Has value | Null |
| Printed | Look down | Has value | Has value | Has value | Has value |
| Descrizione | BoolRichiesta | Valore | OK(Validati) | Firma | Stampa |
| Emogramma | BoolHemogramma | Hemo | HemoCd4DataOK | IdFirmaEmatochimica | HemoCd4DataStampa |
| CD4 | BoolCD4_CD8 | CD4 | HemoCd4DataOK | IdFirmaEmatochimica | HemoCd4DataStampa |
| Biochimica | (for every bool) | (for every bool) | ChCLDataOK | IdFirmaEmatochimica | ChCLDataStampa |
| Viral load | BoolCViral | CViral OR Esame2 | TestMolecolariDataOK | IdFirmaTBC | TBCDataStampa |
| Hivdna | BoolHIVDNA | (?) request hivdna | HIVDNADataOK | IdFirmaHivDna | HIVDNADataStampa |
| Rapid Test | BoolHIV | (?)request rapid test | same biochimica | biochimica | biochimica |
total calculation
| NID | BoolCompleted | ||
| Total Exams | All | ||
| Totale Requested | not Null | ||
| Non completed | False | ||
| Printed more times | BoolCViral = false OR BoolHemogramma = true OR BoolCreat = true OR BoolGlic = true OR BoolBlTot = true OR BoolBlDir = true OR BoolGOT = true OR BoolGPT = true OR BoolAlbu = true OR BoolFerritina = true OR BoolHIV = true OR BoolCD4_CD8 = true OR BoolPlasmodium = true OR BoolAlfaAmilasi = true OR BoolColHDL = true OR BoolTrig = true OR BoolFerro = true | ||
| Ematochimica not signed(not completed) | False | BoolCreat =true) OR (BoolGlic = true) OR (BoolBlTot = true) OR (BoolBlDir = true) OR (BoolGOT = true) OR (BoolGPT = true) OR (BoolAlbu = true) OR (BoolFerro = true) OR (BoolFerritina = true) OR (BoolAlfaAmilasi =true) OR (BoolColTot = true) |(BoolColHDL = true) OR (BoolTrig = true)) OR BoolHemogramma = true OR BoolCD4_CD8 = true) and ((BoolCompletato =false) and (string.IsNullOrEmpty(IDFirmaEmatochimica) | |
| Ematochimica Signed but not printed | True | IDFirmaEmatochimica =Not null |
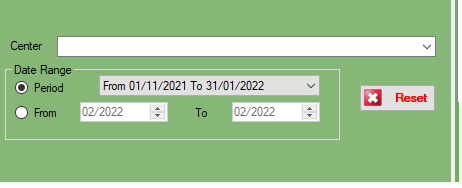
In this section, we can filter all data
The Filter FROM and TO doesn’t have a date because the report will automatically show all result from the first day of the month to the last day of the selected ending date.
8.Machine connection
To receive data from machine device like (Horiba, sysmex etc..) we use a certified program :”Advanced TCP/IP” released from AGGsoftware.
This program can keep listening from TCP door all data sent and add into SQLserver.

This program can show a log and history of all data sent
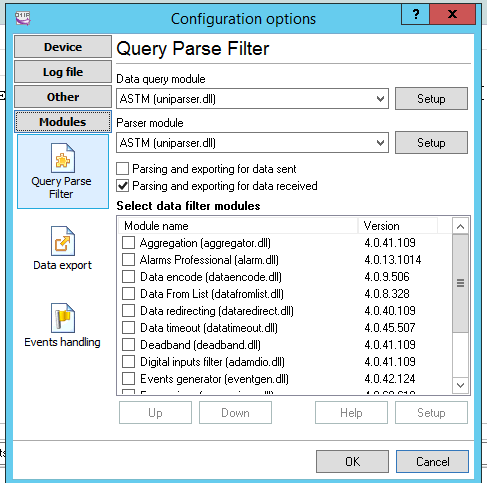
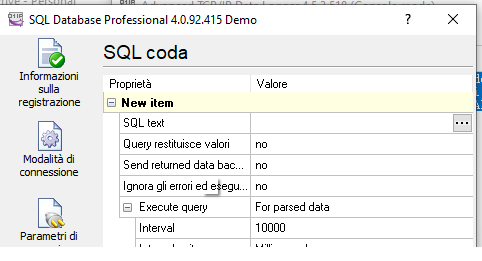
The configuration needs to set the Parse method, in this case we can select ASTM (or ASTM tcp) then set that we want it to export the data selecting the checkbox
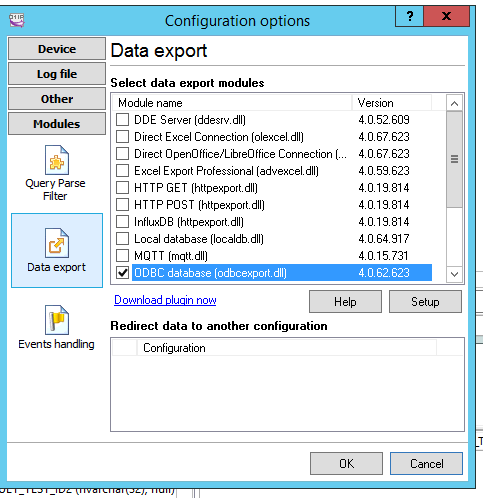
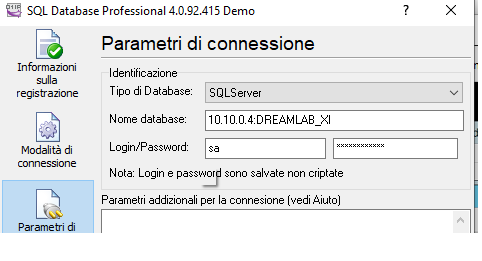
The Configuration of Data export allows multiple choice, to choose SqlServer we can select ODBC or SqlServer dll,
in this example we use ODBC

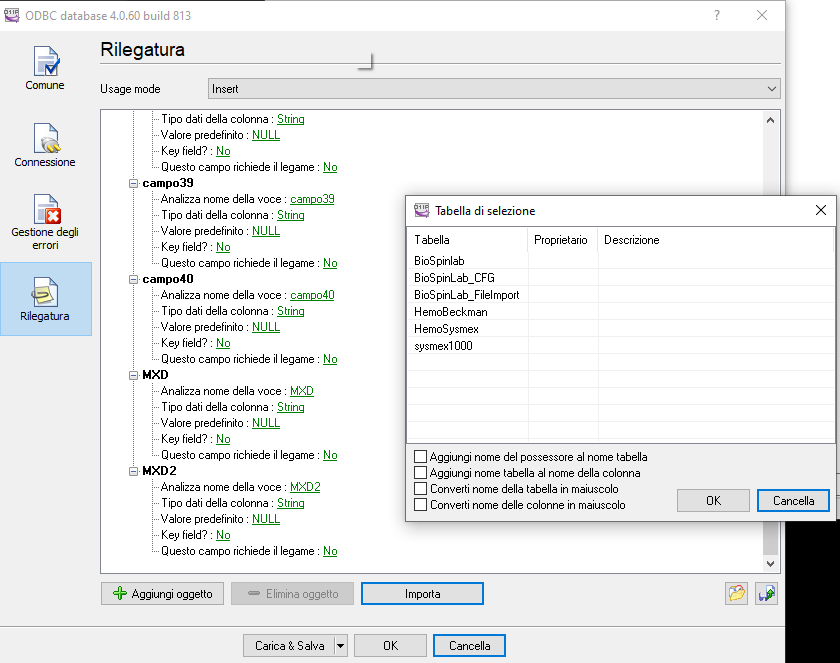
To do that we need to create a ODBC connection, we can call “TCPListener” that targets SQLserver
Than going back to TCP/IP listener and selecting “IMPORT” it can recreate all table structure for the insert statement.
Note that he cant manage key field, better remove , here we have ID field that is an autonumber.
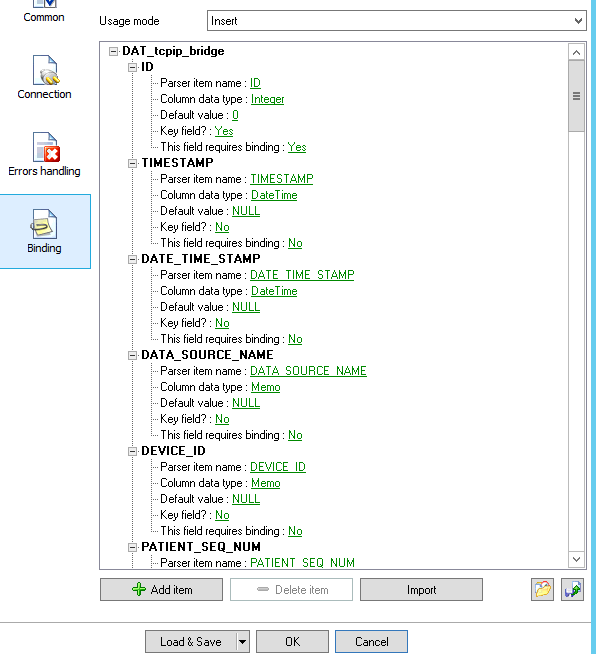
if you have SqlServer connection then select the … button and add the SQL statement to recreate your query,
the file is located in FTP on the DREAM server “dreamlab\machines\[Laboratory name]”
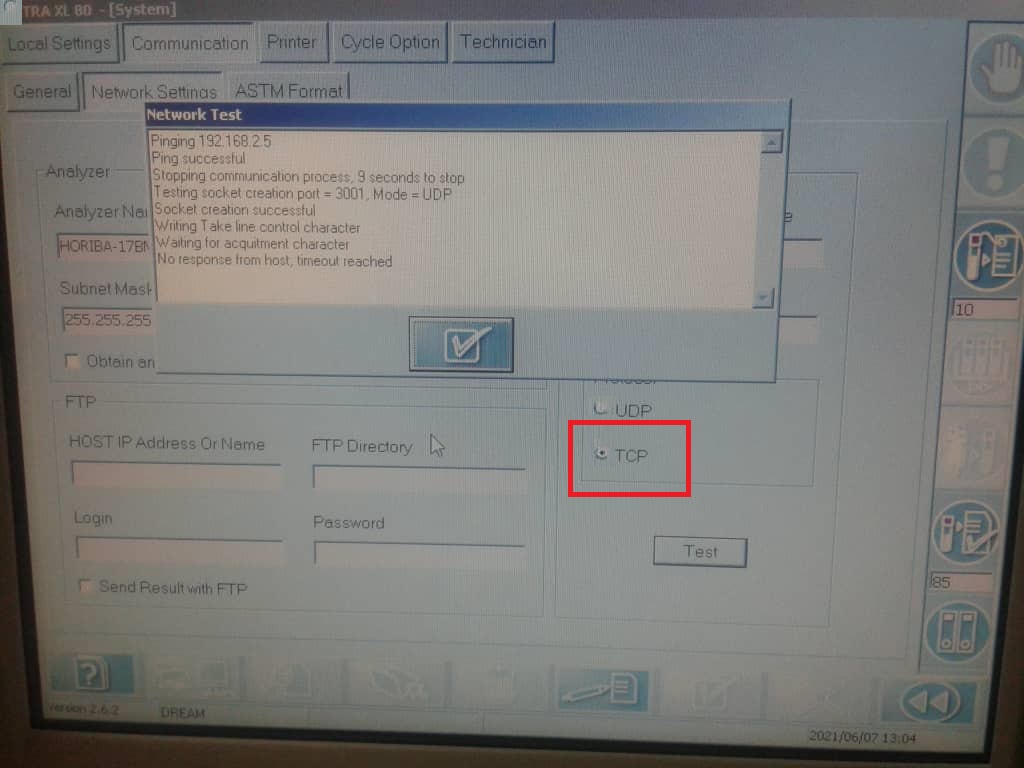
In the machine we have to set ASTM method to export data and TCP port

9.Evidence
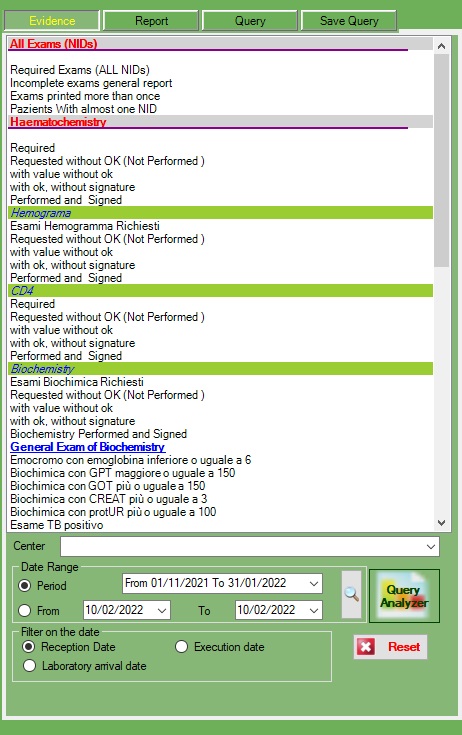
In this section we can have different ranges of exams and queryes
All exams
Haematochemistry
Hemogramma
CD4
Biochemistry
Viral load
HIVdna
Sars-cov-2
TB
QueryVL.
All query can be filtered for the filter section below
This can be for Center, Period , range of date and date of (arrival , execution, reception)
QueryVL
Is a special query requested that contain personalized field on result
This QueryVL will show results of exams who have VL prescription where the value is null.
This query can be filtered for the parameters on the form.
When exporting the results via excel DreamLab will use a template in the support folder: VL_LAB_updated.xls, and will write into “DATA” sheet, this file already contains the filters in “PIVOT” sheet that can be used to filter the results.
This function uses an Interop Excel dll, it means excel must be installed on the computer.
In the Biochemistry query, a form will be showed asking to select the exam from a drop down selector
Like the queryes above even here will maintain the filter for dates

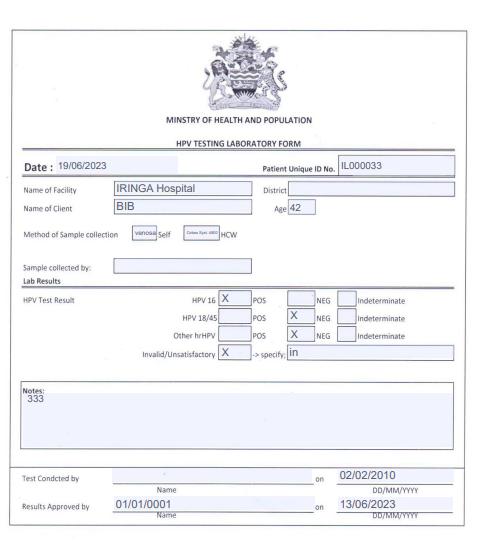
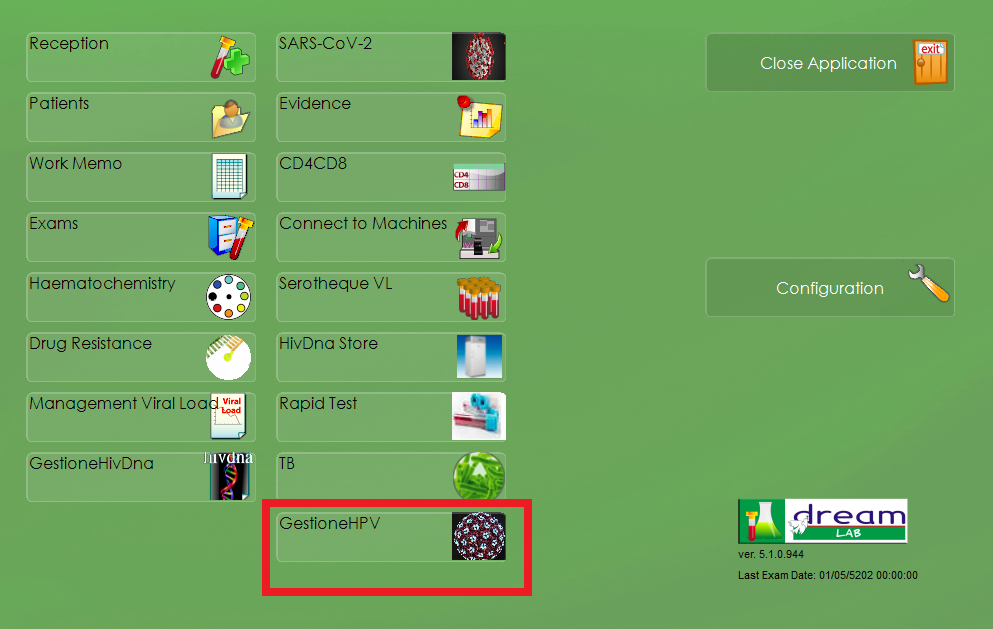
10.HPV
HPV
HPV can help to manage the hrHPV DNA tests.

The result of HPV is divided in multiple combobox results who can have “Positive,Negative,indeterminate” as a result, in case of invalid is possible just to enter the description
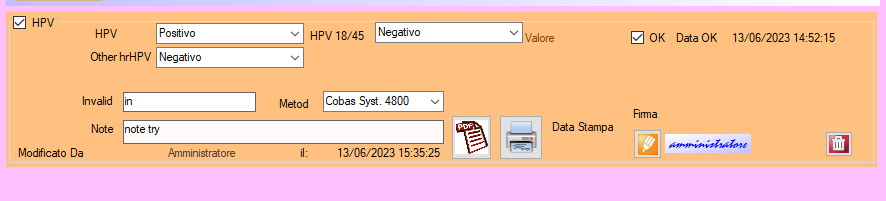
If the file “HPV_template” exists in template folder, a PDF print button will be showed on the form, this function will allow to use a template for each different country, he just replace the placeholder in the PDF with the correct value, below an example of PDF template.